Wednesday, 5 April 2017

Animation Practice: Character Concept Art


When designing the character I had various wildly different ideas originally but eventually narrowed down a character I thought would be interesting. Ultimately I took elements from each design and integrated them into the final character design.

Space Smuggler concept:

Originally I played around with the concept of a sci-fi smuggler character wearing a futuristic hard-surface outfit. I tried different ideas for his head after as I was happy with his outfit but ultimately I felt like I could do something a little more interesting.


After deciding to try other concepts, I sketched some various, wildly different ideas for a character to see if anything seemed interesting. With another sci-fi character at the top right, I decided to go in the opposite direction and try a film noir approach with a detective character. While I was considering going with this idea and putting an interesting spin on the design, such as a film noir cop in the future, I decided to keep trying other ideas. This eventually left to the bottom left concept which I didn't fully flesh out, but later served as the basis for the design of my final character.


Continuing from the design previous, I tried drawing what I thought an interesting post apocalyptic protagonist would look like, in the same vein as Mad Max and other silent protagonists. This quickly led to the initial concept of a leather jacket-clad, red scarf-wearing female post-apocalyptic character. While I eventually decided to not give the character a jacket or coat, I went through different ideas for the clothing. 

As mentioned previously multiple elements from experimenting with the previous character designs made their way into this character's design. The overall lower body appearance of combat boots and trousers from the last page's last design served as the inspiration for her current design, albeit with vintage motorcycle boots replacing them. The two belts in the sci-fi concept also made their way into this design, with the 2nd belt becoming a shotgun shell belt and the scarf from the original sci-fi smuggler being used and made more important to the overall design.


With the character's design almost finalised, I began thinking of the prop and pose for the character. I quickly decided on her having a Ithica 37 shotgun. The weapon is commonly used in post apocalyptic video games and movies and has essentially become what we think of when we hear 'shotgun'. For the pose I drew two ideas, one a confident yet cold firing stance, as if about to execute someone, and the other a more relaxed pose of her smoking while sitting. I eventually decided to use the first pose as I felt like it would show more of the character, without boxes obscuring her, and also because it shows more of the character's anti-hero personality.


The final pose

Animation Practice: Development and Experimentation

For this project I decided to model parts in Maya and then flesh them out in ZBrush to ensure everything would be proportional and, considering the amount of hard-surface elements, would look how they should. A majority of the project was done in ZBrush still, but Maya was invaluable for quickly and efficiently creating the low-poly, detail-lacking base meshes for various parts, especially the more complicated parts like the belt buckle.

I first began with the base mesh. This would be the underlying body mesh of the character that I would use to rough out the proportions, shapes and topology. While I originally planned on using ZSpheres, I decided to go with this approach as it would be more useful further on when I needed to make clothing and accessories.

Thanks to the GoZ tools included in ZBrush, moving the models between Maya and ZBrush is fast and efficient.


The first iteration of the mesh, while the image planes aren't visible, I made sure to follow reference images to ensure realistic proportions were achieved.

A majority of the time spent modeling was done with smooth mode on, to make sure the mesh would look fine in ZBrush and be an appropriate base for the rest of the clothing.

Once the base mesh was finished I began using it to create the mesh for clothing by duplicating the polygons from the base mesh. This ensures the topology is inherited from the base mesh and makes create of clothing far easier.
Basic mesh for the trousers, belt and top.
A screenshot of the first model sculpted in ZBrush, the top.


Initial model of the boot and it's various parts.
Thanks to using Maya in the pipeline, creating multiple elements suchs as the belts and zips on the boots was quick and easy and allowed ideas and concepts to be tested quickly with a rough representation of what it may look like in the final sculpt.

Boots and trousers imported into ZBrush.
The boots after having details sculpted on.

Folds sculpted onto trousers with leg bandage and belts added

For this project I decided to include a shotgun as the prop of the character, I chose to model the Ithica 37 and tried two different versions, one with a longer barrel and one with a shortened one. I eventually ended up using the shorter barrel one.


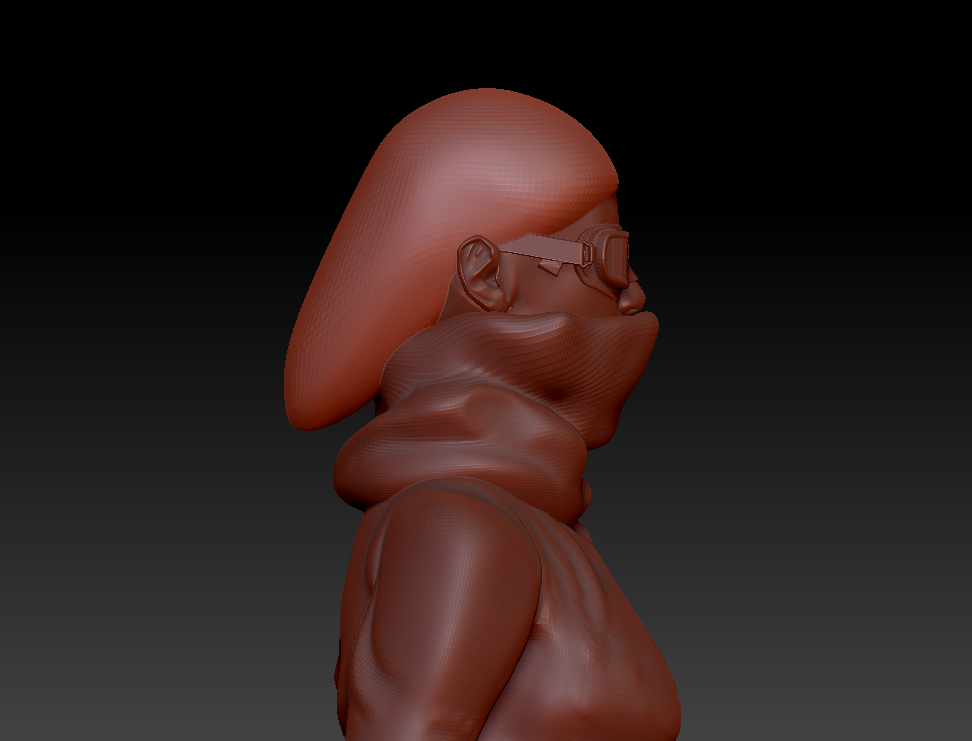
After modelling the head mesh and importing it, I used ZBrush to sculpt a thick scarf and Maya to model the goggles

For the hair, I hadn't made a final decision on whether to have her hair tied back like in the original concept or to have it down to her shoulders as seen in one of the concept drawings I did. To experiment I tried creating the long hair and seeing how it would look.


While I think the result was good, I also made another version of the hair but tied back, and compared.


I prefer the tied-back look and decided to use that in the final sculpt instead, but the original hair was helpful for experimenting with the tools I'd use for the final hair.

The final model, featuring the finished scarf and the additions of gloves and shotgun shells to the 2nd belt.

POSING

With the model finished, it was time to pose the model. Using the ZBrush Transpose Master plugin included with the software, I was able to pose the model without merging everything into one model.


The plug in temporarily merges the subtools to their lowest divisions and merges them, from there I seperated the different parts of the model I'd pose into their own polygroups and from there rotated them into position.


Once done with posing I had let the plug in automatically reflect the pose onto the original tool, all that was left was to clean up the stretched geometry and pose the fingers and the prop.
Before adjustments - Low Divisions
After adjustments - High Divisions


With the character posed and a few adjustments made, all that was left to do was render.


RENDERING

ZBrush features a robust renderer that gives the user an incredible amount of control over various rendering elements such as ambient occlusion, ZDepth and many more variables.


From the Render Properties menu elements can be turned on and off, allowing for more or less detailed and calculated renders.


The BPR RenderPass menu lists the various maps generated when the model is rendered. These maps are incredibly powerful for fine tuning things such as depth of field and shadow strength to the user's preference later on.

These maps can then be individually exported from this menu and used in programs such as Photoshop.


Importing these channels into Photoshop allows the user to alter elements such as Shadow strength and Depth of Field in real time, without having to re-render after every change, like if they were to make these changes in ZBrush itself. This workflow is an invaluable way to fine-tune renders and achieve the results with real-time feedback and not down-time between changes.

Tuesday, 7 March 2017

Animation Practice: Anti-Hero and Character Research

Anti-Hero:

Wikipedia defines an Anti-Hero as: "a central character in a story, film, or drama who lacks conventional heroic attributes."


An example of an Anti-Hero would be Han Solo. Han Solo is a sleazy smuggler, a criminal in the eyes of the Galactic Empire who isn't unused to killing people like Greedo. For the majority of A New Hope, Han Solo isn't driven by a sense of doing the right thing or helping others, but simply payment for transporting Luke. Later in the story he becomes motivated by a desire to do the right thing, while still retaining some of the elements that make him an Anti-Hero.

Han Solo is the perfect contrast to Luke Skywalker, the traditional hero of Star Wars. Luke is driven, self-less and fights because of his sense of justice and desire to do good. Whereas a hero like Luke would help out if possible and avoid conflict or killing, an Anti-Hero like Han Solo would be more interested in how these situations would benefit him.


One of the most notorious Anti-Heros in cinema history is Escape from New York and Escape from L.A protagonist, Snake Plissken. Multiple times throughout both movies Snake witnesses a helpless person being attacked but he does not help, whereas a hero wouldn't waste a minute to consider it. His motivation in both movies is one of survival and self-interest, forced onto an almost suicidal-mission to save the president. While a hero would be doing this for reasons such as saving lives and stopping criminals, Snake's sole reason for this is because if he doesn't complete his mission, a bomb in his neck will detonate, killing him.

In conclusion, an anti-hero is defined as a character who, while a character we would typically want to succeed, has some qualities that would be considered non-heroic or good. A typical expression for the attitude many of these characters would have is 'The End Justifies The Means'

Character background:

Silent, lacking morals and vengeful, no one knows the name of this stoic warrior of the post-apocalyptic wasteland of London. Once a average girl trying to survive in her small settlement, her life was ruined by raiders and bandits attacking the village and taking her and other hostage. The only one to survive after they began torturing and killing her and her fellow villagers, she took her killer's jacket and weapon, roaming the wasteland to kill anyone who with any connections to the raiders who raided her settlement.

Drawing elements heavily from Mad Max and Fallout, two series based in post apocalyptic areas, the character and her environment are based on elements someone would see in those.

Sandy and desaturated colours are common in Mad Max shots
The character takes a lot of survivalist elements from characters in the movies.


The thrown-together and survivalist look of characters from post-apocalyptic media servers as the basic for my character's outfit with some changes made to reflect the character herself, such as her scarf covering her mouth as a way of representing her muteness. The abundance of red also hints to her vengeful nature.

LINK TO MOODBOARD

Progress:

Originally I was going to start working on the character using ZSpheres but later decided I should create a basic, low-poly mesh in Maya instead. ZSpheres are incredibly effective for getting basic proportions and for quickly converting them into a mesh, but for this project I think I will get more control and quicker results once the low-poly mesh is finished. The ZSphere test turned out too masculine and made me decide to try going back to modeling instead.


This is the current progress on the low-poly mesh which is obviously unfinished. Extra care has been put into the topology to make sure it will deform and sculpt properly.


Friday, 27 January 2017

27/01/2017 - VFX Group Discussion

27/01/2017 - VFX Group Discussion

CJ is not present due to personal reasons.

15:40 - Group meeting begins

15:41 - Denise proposes idea and moodboard for 'TLHM_Footage_QT_Preview_4' : Replace the statue with a futuristic device in the first scene.

15:43 - Manuel proposes idea and moodboard for the same video, showing his ideas : Replace the statue in the warehouse scene.

15:45 - Thomas explains that he also had the same ideas for 'TLHM_Footage_QT_Preview_4'. The three members present, Denise, Manuel and Thomas, discuss which elements would work and how they could be achieved. Thomas proposes that, as a character casts a shadow on the statue, we create a low-detail version of that character to cast a shadow on whatever CG model we choose to replace the statue.

15:53 - The group consults Jin and is told their idea is too complex

16:05 - Preview7's shot at 2:00 is considered

https://drive.google.com/file/d/0BxkkBgxeQMUxQmZRTUlXOExIeEk/view

URL'

Friday, 20 January 2017

Animation Practice Evaluation

Animation Practice Evaluation

For this coursework, we were tasked with animating a scene based on audio from monthly audio contests at the 11 Second Club. At the time of planning, the audio in the monthly contest was from Star Wars: The Force Awakens, and this audio was chosen. Unfortunately the final product didn’t turn out as expected. A glaring problem with the animation is the vast difference in animation quality between the two characters on screen. This is a result of rushing the animation due to time constraints and lack of fine tuning of interpolation. The lighting isn’t as good as hoped for as problems were encountered late into lighting and couldn’t resolve them. The final lighting looks very dull compared to what was intended.

If more time was allotted, more time could have been spent making sure the quality of animation is consistent and the lighting interesting.
Lip syncing and animation was one aspect of this project that is inconsistent. As previously mentioned one character’s animation was rushed, however the character on the right is animated more or less exactly as intended. The environment was also rushed due to poor management of time, while a majority of time was spent on animating a single character,  texturing or modeling the environment, and other aspects, were neglected, as a result it relies solely on use of flat colours and Arnold renderer materials. In future projects, time will be managed more efficiently, putting more effort into all aspects of the project, rather than spending too much time on one part. Additions such as bump mapping, more detailed modeling and more interesting lighting would have gone a long way with improving the overall quality and look of the scene.

Another complication in the process was the necessary use of the new Arnold renderer for Maya 2017 which caused numerous issues due to a lack of familiarity and experience, as opposed to Mental Ray, which, due to it shipping with both 3DS Max and Maya for numerous years, has a large amount of resources online for learning. Adjusting to Arnold took quite some time but a lot was learned during the process, allowing for experimentation with many different rendering settings that will be useful for future projects. If given more time, more time would have been spent experimenting with Arnold and seeing what can be done, improving how fast the same results or better could be achieved. Regardless, the experience gained from this project is invaluable and has given the knowledge needed to further experiment with Arnold.

The project was further complicated by render times and underestimating them. Originally the animation was intended to be 60FPS, but upon testing out different render settings, rendering times per frame were reduced from around 6 minutes to 2, Meaning it would take up to 20 hours or more to render the whole animation. Unable to do that due to time constraints, the animation was reduced to 25 frames per second and many render quality settings were lowered to get a complete render in time for the deadline. Depth of Field and Z-Depth were originally planned to be used during this project but since render times were already a problem with the limited time left, they were omitted to focus on allowing enough time to render and upload the animation.

The rendered files were imported into After Effects to be rendered as the final .mp4 file. Unfortunately because of a known bug with the specific version of After Effects used on University computers, rendering the project out was impossible without audio errors and problems.

Ultimately, this project was a learning experience that was held back by time constraints and my own failure to work efficiently in them. If I had been given more time, I’m certain I could easily build upon what I learned during this project and produced a far better animation. I believe future projects will benefit immensely from what I’ve learned during this project, from rendering with Arnold to lighting a scene.

Animation Practice: References

11 Second Club: http://www.11secondclub.com/

"11 Second Club - The Monthly Character Animation Competition". 11secondclub.com. N.p., 2017. Web. 20 Nov. 2016.

Both characters are Max rigs provided by 11 Second Club on their website and belong to Peter Starostin and James Hunt. Their original website and the rig can be found here:

http://www.bockstyre.com/james/maxformaya/